Posted in Lifestyle

Modern Round Coffee Tables

Why Choose a Round Coffee Table for Your Living Room:

Shop These Tables

When selecting the perfect centerpiece for your living room, a round coffee table offers both style and practicality. Whether you’re working with a cozy apartment or a spacious living area, Lowe’s has a wide selection of round coffee tables to suit any space and taste. Here are a few reasons why a round coffee table could be the ideal choice for your home.

Disclaimer: This post contains affiliate links. If you make a purchase through these links, we may earn a small commission at no extra cost to you.

2. Versatile Styles and Finishes
Lowe’s offers a variety of round coffee tables in different finishes, from sleek metal and glass designs to warm, natural wood and even modern marble. No matter your interior style—be it modern, traditional, or mid-century—you’ll find the right table to complement your space.

1. Maximized Space & Flow
Round coffee tables are perfect for smaller rooms or open-plan spaces, as their shape promotes a smooth flow of movement and maximizes the usable space. Without sharp corners, they also reduce the risk of accidents, making them a safer option for families with children or pets.

3. Aesthetic & Functional
A round coffee table doesn’t just look good; it’s highly functional too. Perfect for holding drinks, books, or decorative pieces, these tables also serve as focal points that enhance the visual appeal of your room.

Something for Everyone

I’ve curated these tables with both style and budget in mind, offering options ranging from $150 to $780 to suit any space.
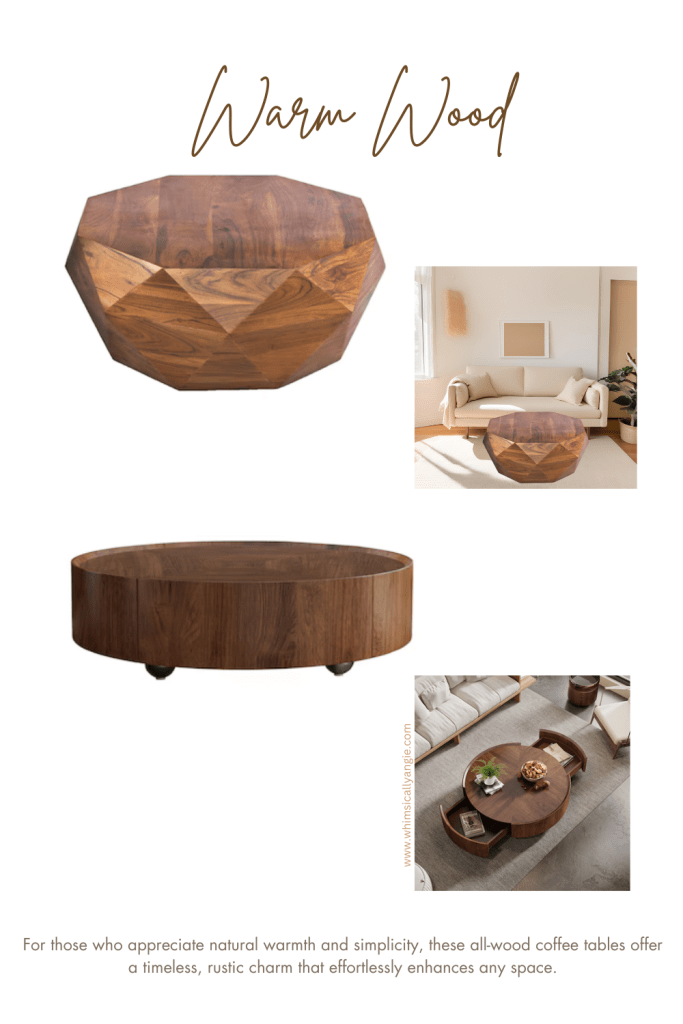
SHOP ALL TABLES HERE

1. Warm Wood

For those who appreciate natural warmth and simplicity, all-wood coffee tables bring timeless warmth and organic charm to any home. Wood adds depth and texture to your space while maintaining a sense of calm. These tables are ideal for creating a cozy, earthy atmosphere that never goes out of style.
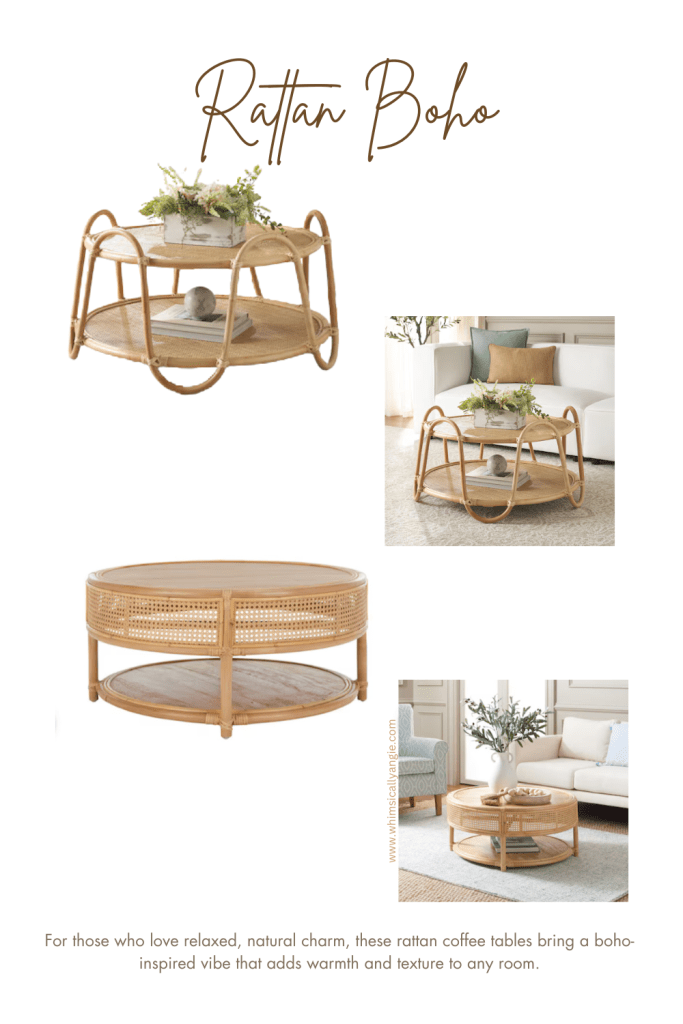
SHOP ALL TABLES HERE

2. Rattan Boho

For a laid-back, bohemian vibe, rattan coffee tables bring natural texture and earthy appeal to your space. The lightweight material exudes a relaxed yet stylish atmosphere, perfect for creating a cozy, inviting living room. Ideal for those who love a carefree, nature-inspired aesthetic, rattan adds warmth and an effortlessly chic touch to any decor.
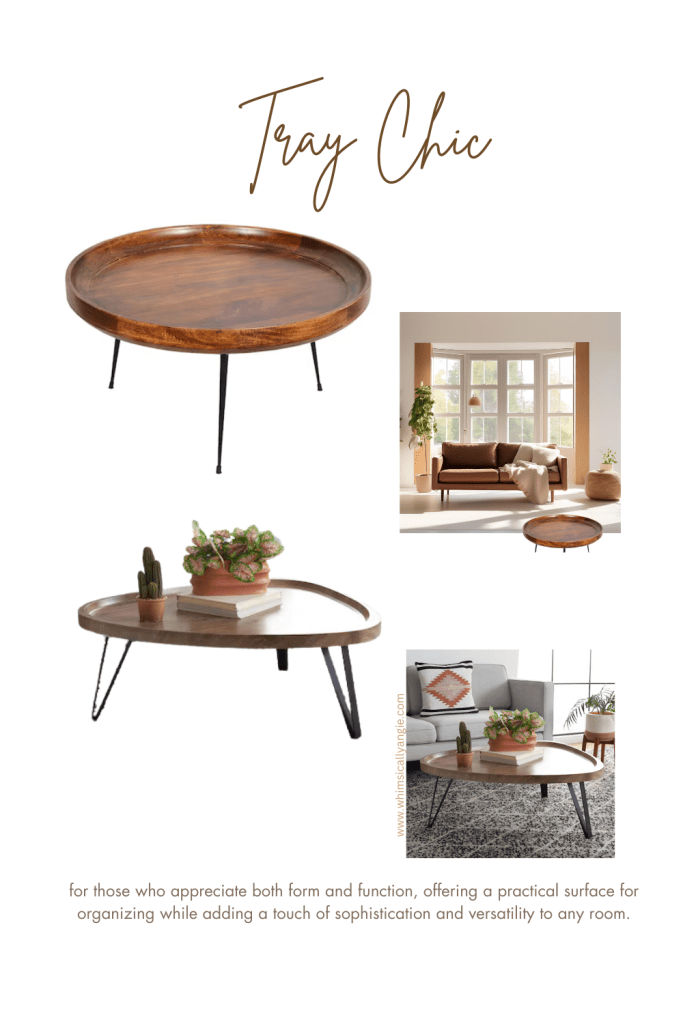
SHOP ALL TABLES HERE

3. Tray Chic

For those who appreciate versatility and sleek design, tray coffee tables offer both function and flair. Perfect for organizing remotes, books, or decorative pieces, they also provide a stylish surface that can be easily rearranged. Whether you prefer minimalist elegance or a more vibrant look, tray tables bring a refined touch to any living room.
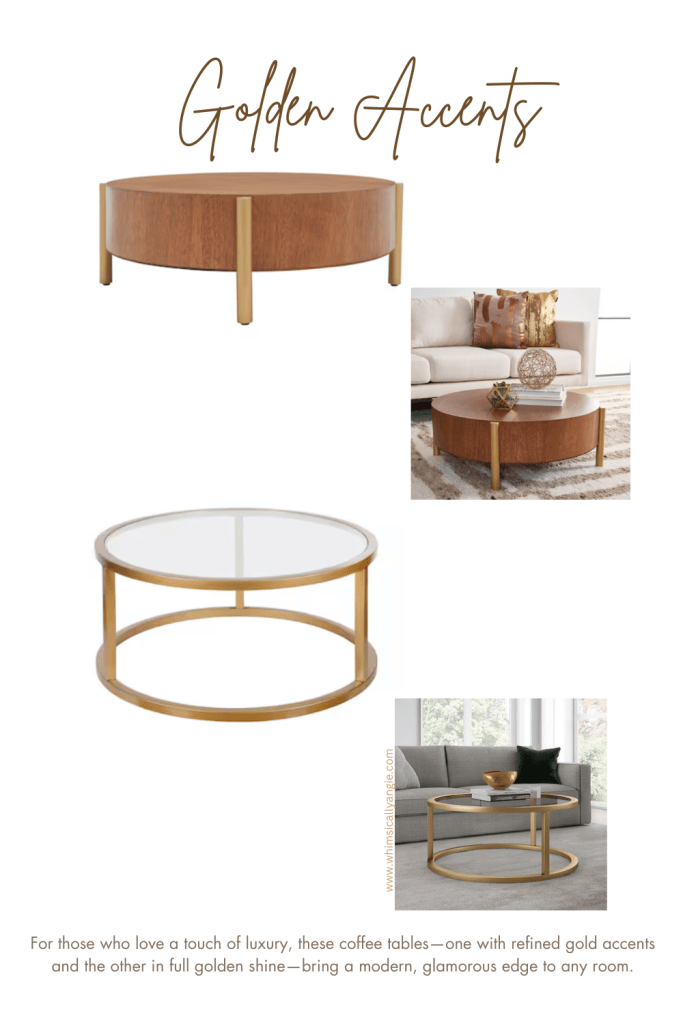
SHOP ALL TABLES HERE

4. Golden Accents

If you’re drawn to bold sophistication, gold-accented and all-gold coffee tables are the epitome of modern luxury. The subtle contrast of gold accents adds a touch of glamour without overwhelming the space, while an all-gold table makes a striking statement. Both styles elevate a room’s aesthetic, perfect for those who love a bit of shine in their decor.

SHOP ALL TABLES HERE

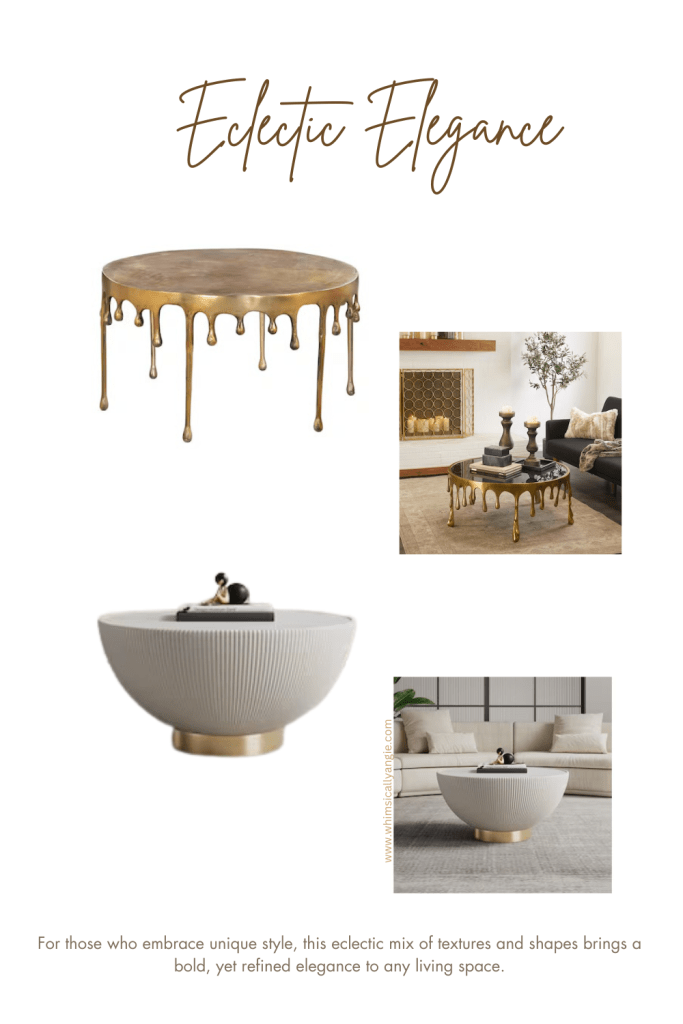
5. Eclectic Elegance

Eclectic Elegance is all about celebrating playful shapes, bold textures, and unexpected combinations that add character to any space. This style encourages mixing diverse materials—like marble, metal, and wood—while keeping a sense of balance and sophistication. Perfect for those who love to have fun with their decor while maintaining a refined, curated aesthetic.

SHOP ALL TABLES HERE
Posted in Christmas, Lifestyle

Advent Calendar for Kids: Crafting a Meaningful Holiday Tradition

The holiday season is the perfect time to engage kids in activities that teach important values like kindness, gratitude, and creativity. One of the most fun and memorable ways to do this is by creating your own advent calendar filled with thoughtful, hands-on activities for the family. I started making these advent calendars a couple of years ago, and every year I add a little something special to make it even more meaningful.

My Advent Calendar Journey

I first began this craft in 2022, planning to make individual calendars for each of my kids. But life had other plans, and I didn’t quite finish them. Last year, I was still working through grief after the loss of my dad, so I ended up keeping it simple — just gluing the pieces together and displaying it as a basic version of what I had envisioned.

But this year? I’m so excited to share that I’ve completed my advent calendar project and made it better than ever! I even created printable inserts with a list of 24 thoughtful activity ideas to inspire family fun during the holiday season. If you’re looking to craft your own meaningful advent calendar, here’s a step-by-step guide to get you started!

Materials You’ll Need:

  • Cardboard (for the base of the calendar)
  • Hot glue gun & glue sticks (for assembly)
  • Box cutter (for cutting out shapes)
  • Cutting mat (to protect your work surface)
  • White Sharpie Creative Marker (for adding details)

Step-by-Step Instructions:

  1. Cut the Cardboard: Start by cutting 15 strips of cardboard, each 4-5 inches wide. The height of these strips will vary from 6 inches to 22 inches, depending on how tall you want your advent calendar village to be. These strips will form the walls of your little cardboard village.
  2. Shape the Roofs: For each piece of cardboard, cut out the roof shapes to give your village a house-like look. You can make the roofs as simple or as intricate as you like.
  3. Add Windows and Doors: The next step is to create a minimum of 24 cutouts for windows and doors on your village houses. Most of these will be the “surprises” that hold your daily activity cards. Make sure to place the doors and windows thoughtfully — you’ll want to have them evenly spaced across your village.
  4. Dry Fit and Assemble: Before gluing everything together, dry fit the cardboard pieces to make sure everything aligns the way you want it. Once you’re happy with the layout, start gluing the pieces together using your hot glue gun. Be sure to leave the backs of the windows and doors open so you can insert the activity cards.
  5. Final Touches: Once your village is assembled, add finishing touches like a bit of decoration with your paint marker. You can draw lines, patterns, numbers, or add little details to the cardboard houses to make them feel even more festive!

Thoughtful Advent Activities for the Family

The best part about this DIY advent calendar is that it’s filled with meaningful activities to do together as a family. I’ve included a list of thoughtful ideas that promote gratitude, kindness, and creativity.

These activities don’t require a lot of time or money but are a great way to slow down and savor the season with your kids.

FULL LIST + Printable Cards HERE

Final Thoughts

Creating an advent calendar for your kids can be a fun and meaningful holiday tradition that helps teach important values while also sparking excitement and joy as you count down to Christmas. Whether you go all out with a creative DIY village like I did or keep it simple, the goal is to make memories and share quality time together.

What activities would you include in your advent calendar? Let me know in the comments — I’d love to hear your ideas!

Happy holidays and happy crafting! 🎄

FIND THIS VIDEO ON INSTAGRAM

Posted in Garden, Lifestyle

Why You Should Plant A Living Walkway

Are you looking to add a unique touch to your outdoor space? A living walkway made of low-growing plants is not only functional but also a stunning way to enhance your garden. Plus, if you’re using a pre-bought plant collection, it’s easier than ever to get started! Here’s how to create your own vibrant green path.

Why Choose a Living Walkway?

Living walkways are a fantastic alternative to traditional hardscaping. They provide a lush, natural look and can help with drainage. Plus, they’re environmentally friendly and can attract beneficial pollinators to your yard.

What You’ll Need

Using a pre-bought plant collection is a game changer! These collections are designed for easy planting and often include a mix of hardy, low-growing plants like creeping thyme, sedum, or moss. Before you begin, make sure you have:

  • Your chosen plant collection
  • Basic gardening tools (shovel, trowel, gloves)
  • Compost (optional, but recommended)

Steps to Create Your Living Walkway

  1. Plan Your Path: Decide where you want your walkway to go. Consider the shape and how wide you’d like it to be. Use stakes or string to outline the area.
  2. Prep the Area: Clear the space of grass, weeds, and any debris. Loosen the soil with a shovel or garden fork. If you’re using compost, mix it into the soil to help your plants thrive.
  3. Lay Out the Plants: Take your plant collection and lay the plants out along your path without planting them yet. This way, you can see how they look together and adjust the spacing if needed.
  4. Planting: Once you’re happy with the layout, start planting! Dig small holes for each plant, following the spacing instructions that came with your collection. Gently place each plant in its hole and cover the roots with soil.
  5. Watering: After planting, give your new walkway a good soak. Watering helps settle the soil around the roots and reduces transplant shock.
  6. Maintenance: While living walkways are generally low-maintenance, keep an eye on them. Trim back any plants that spread too much and remove any weeds that pop up. Regular watering, especially during dry spells, will also help your plants establish.

Enjoy Your New Walkway!

Once your plants are established, you’ll have a beautiful, green path that adds character to your garden. It’s a fantastic way to create a more inviting outdoor space while enjoying the benefits of a natural landscape.

So, roll up your sleeves, get planting, and watch your living walkway flourish! Your garden will thank you for it!

Tapestry Lawn Article on Martha Stewart site