Posted in Halloween, Kid's Crafts, Printables

Vintage Black Cat inspired Candy Bucket Printable

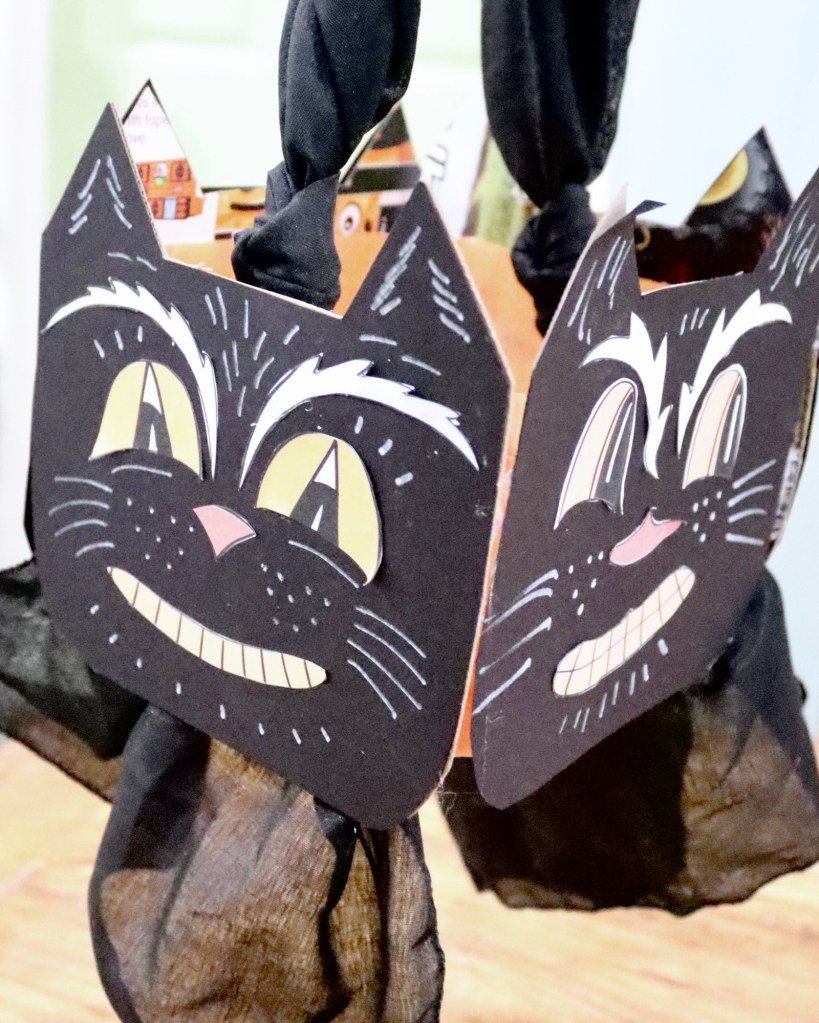
Get ready to unleash your creativity with this vintage-inspired cat-shaped candy bucket project! Perfect for Halloween or any festive occasion, this charming design combines whimsy and nostalgia. With a few simple materials and steps, you’ll create a delightful container that’s not only functional but also a playful decoration. Let’s dive into the fun of crafting a unique piece that will add a touch of charm to your celebrations.

Materials Needed:

  • Milk Jug
  • Spray Paint (optional)
  • 2 Cereal Boxes
  • 2 Sheets of Black Cardstock
  • 3 Sheets Printer Paper
  • White Paint Marker
  • Glue Stick
  • Hot Glue
  • Scissors
  • decoupage medium

Instructions for Assembling Bucket:

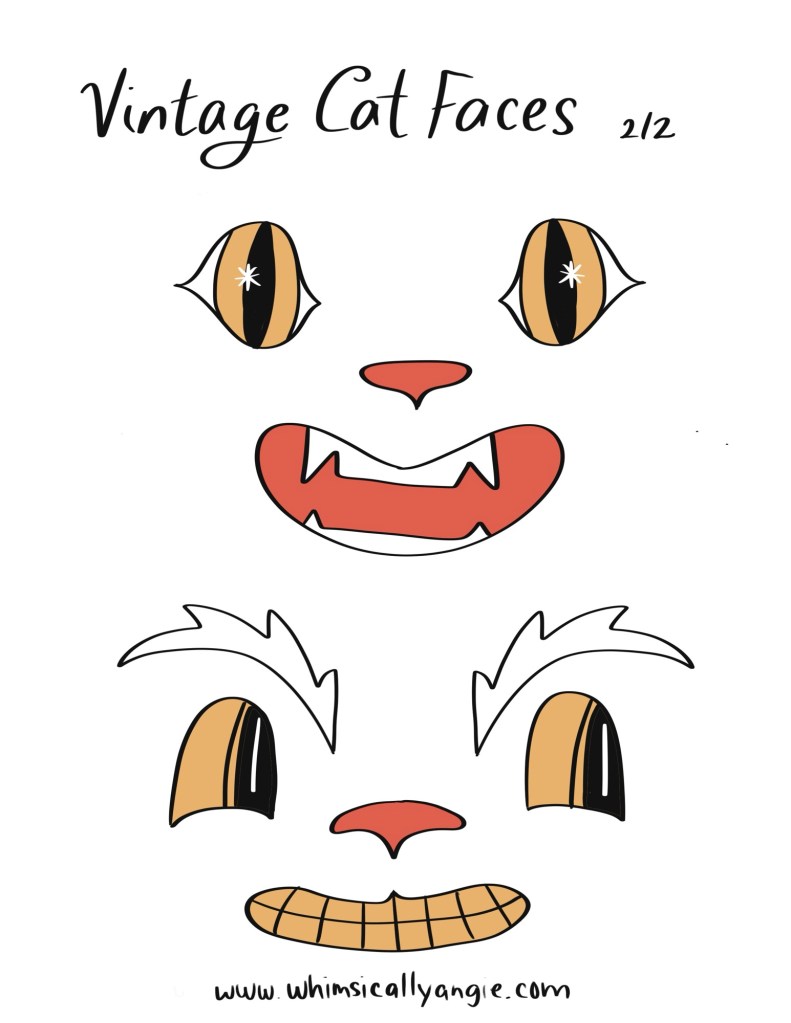
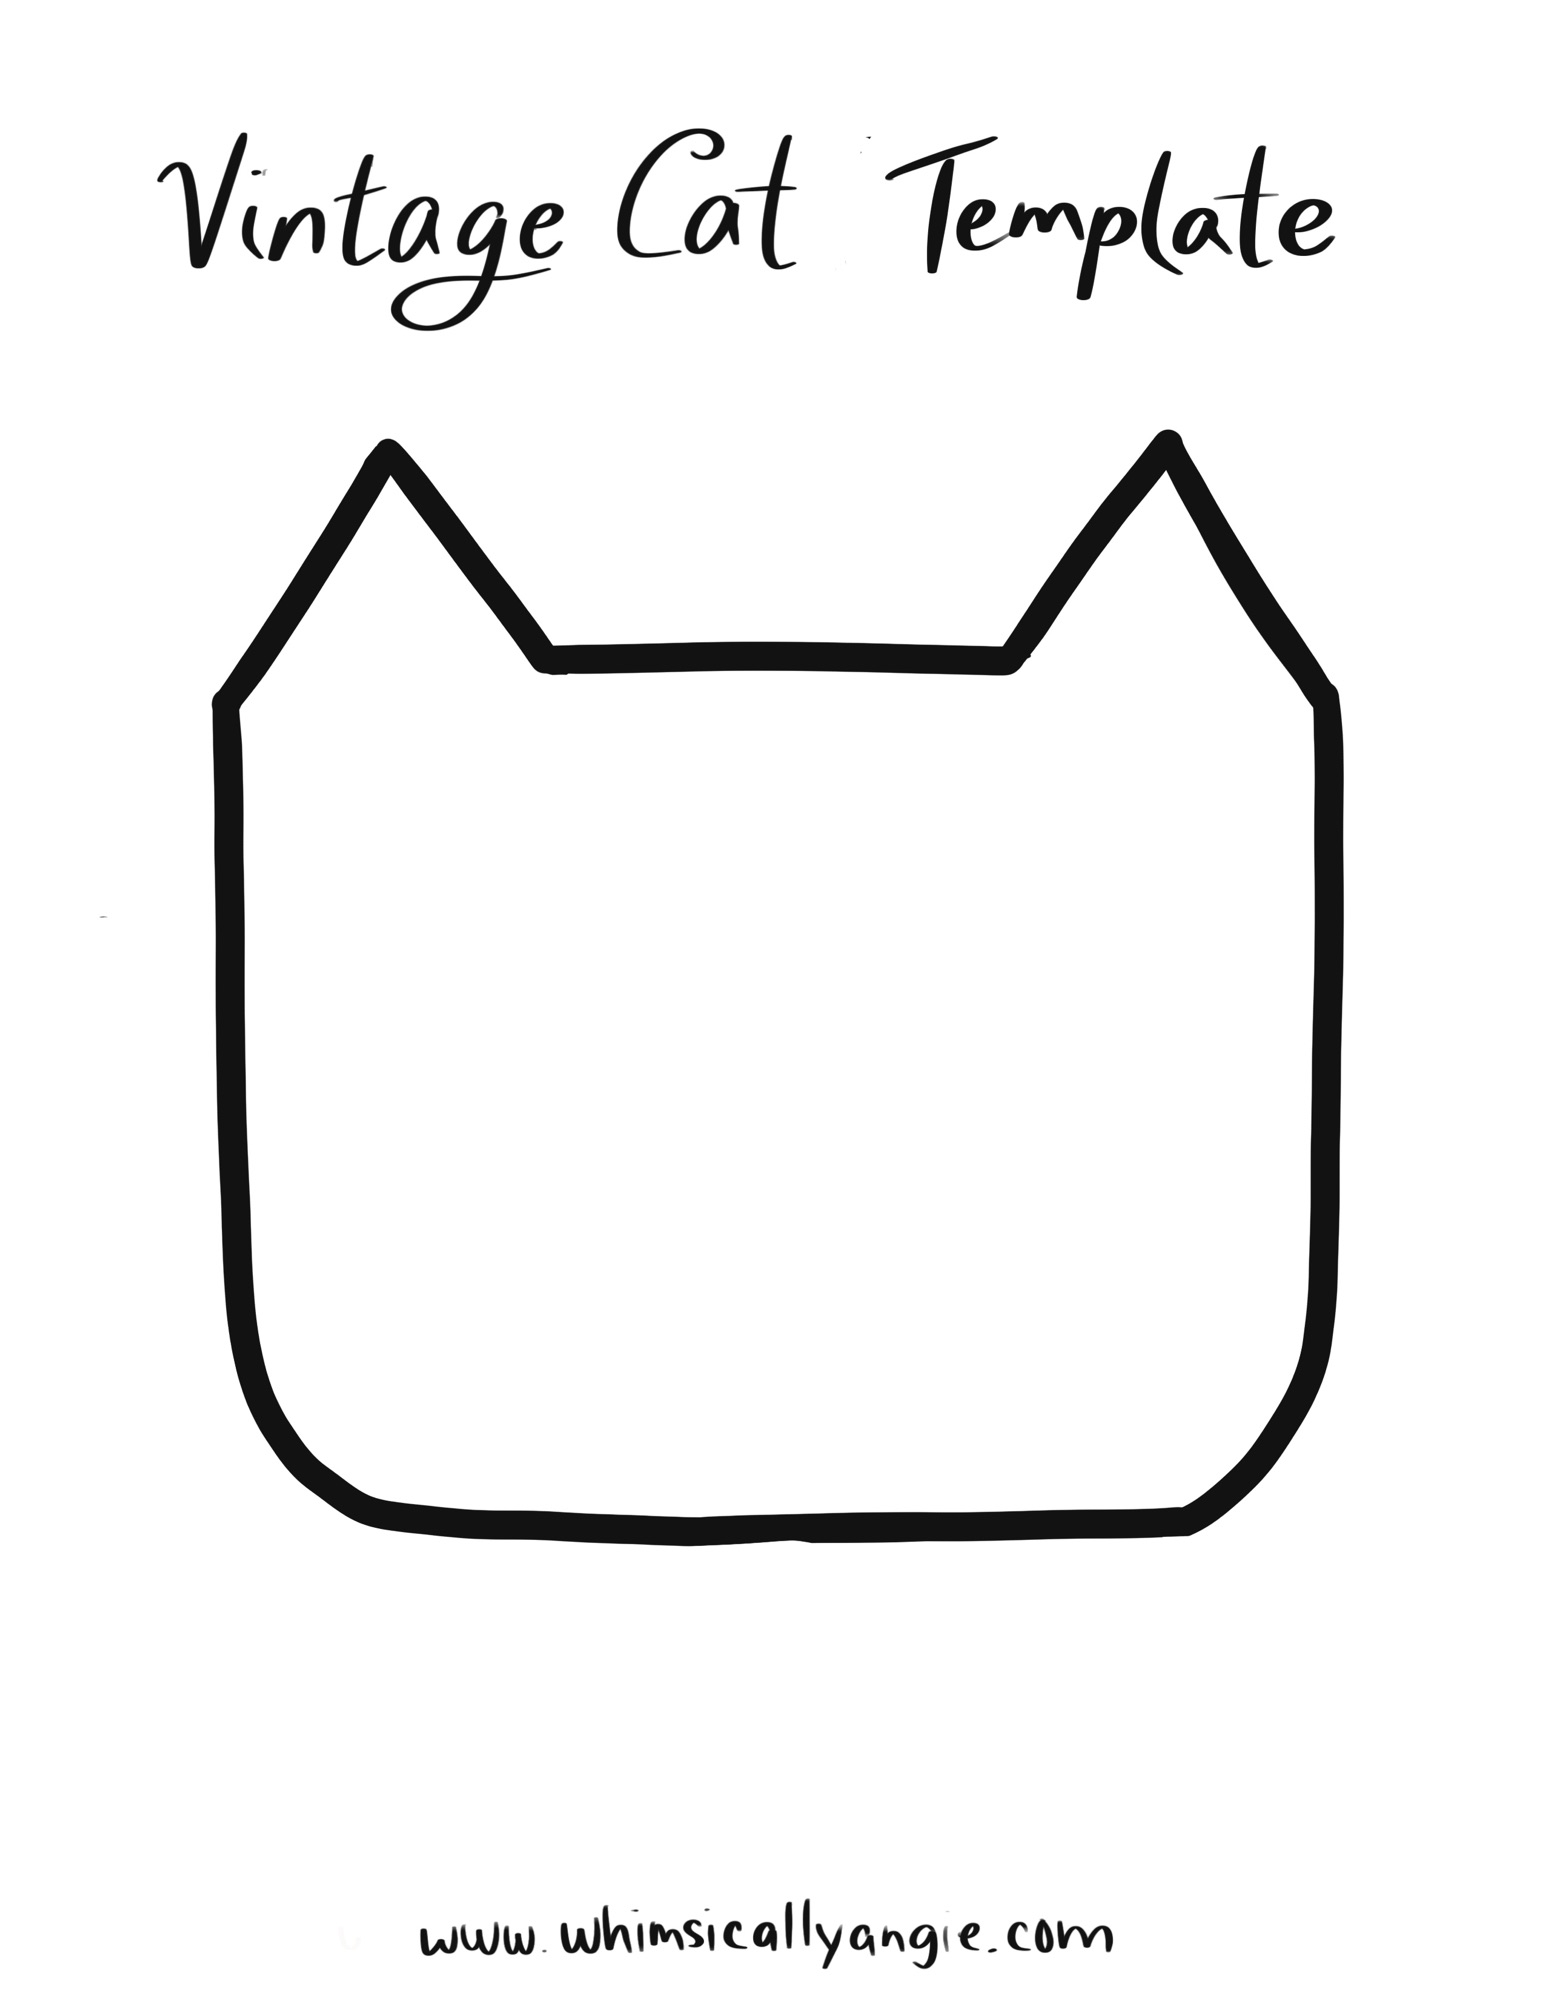
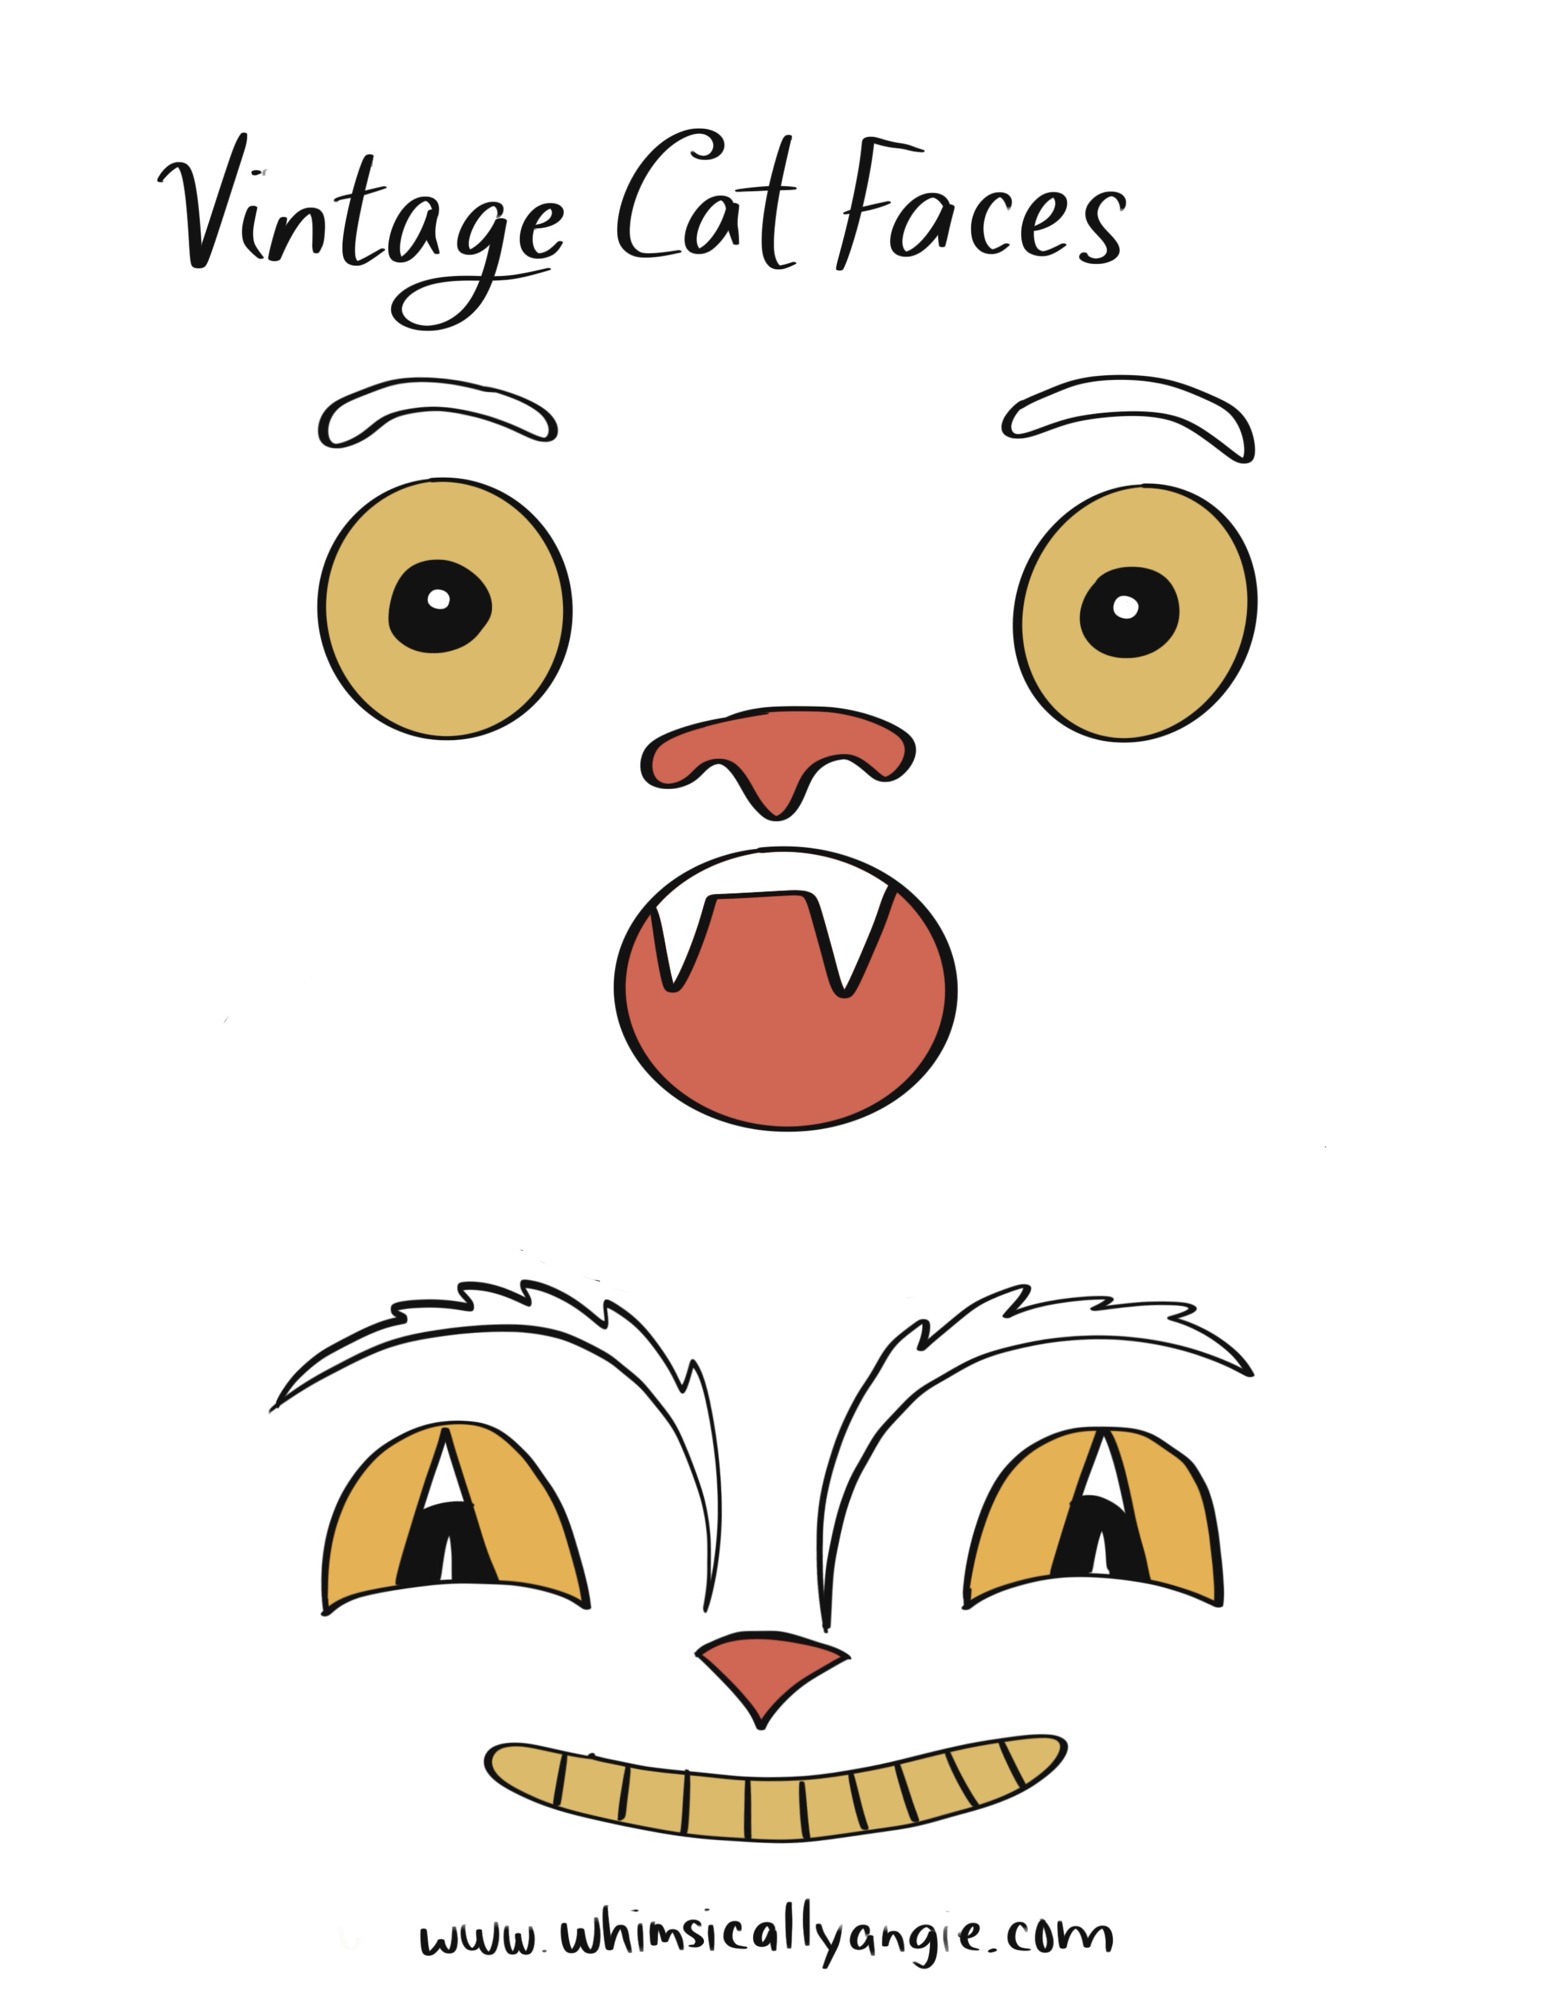
  1. Print Templates ( below )
  2. Cut Out Cat Shape.
  3. Use the Cat Shape as a Template:
    • Cut 4 pieces from cardboard.
    • Cut 4 pieces from cardstock.
  4. Glue Cardstock to Cardboard.
  5. Cut Out Facial Features:
    • Use a glue stick to attach them to the cardstock.
  6. Add Details:
    • Use a white paint marker for extra features.
  7. Prepare the Milk Gallon:
    • Cut off the bottom, leaving a height of about 4 inches.
  8. Optional:
    • Spray paint the inside of the milk jug.
  9. Create Slits:
    • Cut a slit or hole on opposite sides of the milk jug.
  10. Make a Handle:
    • Use ribbon or fabric to create a handle.
  11. Secure the Handle:
    • Glue it in place with hot glue.
  12. Attach the Faces:
    • Use hot glue to attach the cardboard faces to the milk jug.

This vintage-inspired cat-shaped candy bucket is a delightful project that adds a nostalgic touch to any celebration. By following the steps, you can create a charming piece perfect for gathering treats or as a decorative accent. Enjoy the creative process and the joy this timeless design brings to your festivities!

Posted in Halloween, Lifestyle

DIY Halloween Eyeball Decor

Add a spooky touch to your Halloween decor with DIY eyeballs! With just a few simple materials, you can craft a variety of designs that will delight and frighten your guests.

1. Googly Eye Plant

Create a whimsical googly eye plant using a materials from Dollar Tree. Simply attach the eyes to the stems with a hot glue gun for a fun and quirky Halloween decoration.

2. Eye See You Hanging Balloons

Make spooky eyeballs using balloons and paper for a fun Halloween decoration! Inflate small white balloons, then cut pupils and irises out of paper. Tape together and hand from your ceilings for a spooky Halloween party display.

3. Cauldron of Eyes

Along the same line, you can create a spooky cauldron filled with DIY eyeballs using balloons and paper for a perfect Halloween centerpiece! Inflate small white balloons to serve as the eyeballs, then add simple paper irises and pupils. Place them in a black cauldron to create a fun party display.

4. Paper Lantern Eyeballs

Start with white paper lanterns and draw or paint creepy eyeballs on them, complete with colorful irises and unsettling pupils staring at you. Cut triangles out of black cardstock to create lashes, for an extra creative touch.

5. Painted Rock Eyes of Newt

Gather smooth rocks and use acrylic paint to create spooky eyeballs for those witch’s brews. Once painted, you can use them in play kitchens, place them in your garden, on your porch, or even inside as unique table decor.

https://pin.it/6deWQD8E7

Incorporating these creative Halloween decor ideas will surely add a fun and spooky flair to your celebrations, making your space a memorable haunt for friends and family!

Posted in Halloween, Printables

Paper Fortune Teller FREE Printable

Scroll to bottom of page for a Free Blank Cootie Catcher you can customize & a prefilled kids version.

Instructions

  1. Start by cutting out the template square:
    • Cut off the excess paper.
  2. Fold Diagonally:
    • Fold the square paper in half diagonally to form a triangle. Make sure the fold is sharp by pressing it down well.
  3. Fold the Other Diagonal:
    • Unfold the first triangle and fold the paper along the other diagonal, creating a second triangle. Again, press the fold down firmly.
  4. Fold the Corners to the Center:
    • With the paper unfolded, you’ll see the diagonal creases forming an “X” in the center. Fold each corner of the paper toward the center point where the creases intersect. You should end up with a smaller square.
  5. Fold the New Corners to the Center:
    • Fold each corner of this smaller square to the center point again. The paper will now be even smaller, and you should end up with a square with the folded corners meeting in the middle.
  6. Flip and Fold the Corners:
    • Flip the paper over so the folds are on the bottom. Fold each corner to the center again. This will create the final shape with a smaller square with multiple layers of paper.
  7. Create the Fortune Teller:
    • Slide your fingers under the flaps of the fortune teller (the four outer sections) to create the “pockets”
  8. Make sure all the folds are crisp, and your fortune teller should be ready to use!

Using Your Fortune Teller

  • Ask someone to choose a number or color.
  • Open and close the fortune teller while counting out the letters or numbers.
  • Ask them to pick one of the visible options, then reveal the fortune or activity written inside.

Enjoy your fortune teller!