Posted in Printables

Layered Paper Valentines Cake Template

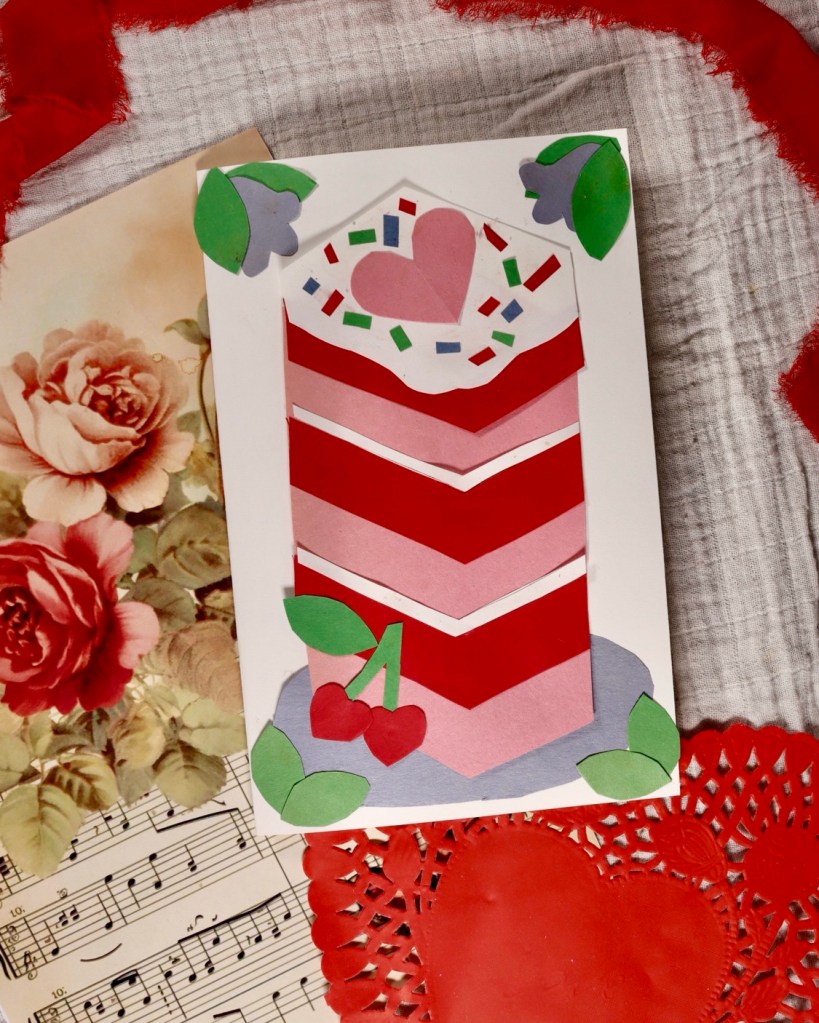
Are you looking for a unique and personalized way to say “I love you” this Valentine’s Day? Look no further than a Layered Paper Valentine’s Cake! This creative, DIY paper craft is a fun way to show someone you care, and it’s sure to stand out among the usual store-bought cards. With its colorful layers, intricate designs, and a sweet message, this Valentine’s Day card will leave a lasting impression. In this post, we’ll guide you through how to create your own Layered Paper Valentine’s Cake Template step-by-step, along with some pro tips for making your card extra special.

What You’ll Need to Make a Layered Paper Valentine’s Cake

Before we dive into the process, let’s gather all the materials you’ll need for your layered cake card:

  • Colored cardstock (red, pink, white, and any other colors you want for the cake layers)
  • Crafting scissors or a precision cutting tool
  • Glue stick or double-sided tape (for assembling the layers)
  • Embellishments like glitter, stickers, or rhinestones (optional for extra sparkles)

Step-by-Step Guide to Create Your Layered Paper Valentine’s Cake

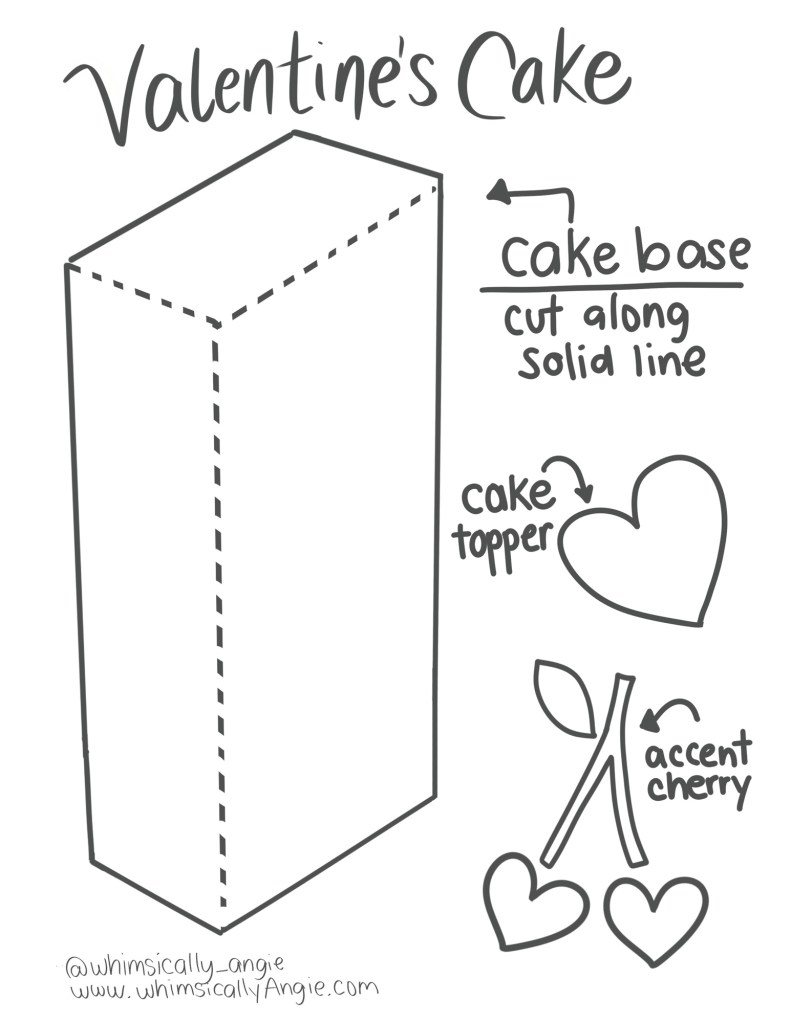
1. Cut Out Your Cake Layers

Start by cutting several layers of cardstock in different colors using my template.

2. Stack the Layers

Using your glue stick or double-sided tape, carefully stack each layer. Pro Tip: Use foam dots between the layers for a 3D effect, which adds dimension and makes the card feel extra special.

3. Create the Cake Top

Once the cake layers are stacked, add the frosting layer. Add the cake topper (template provided), cut confetti out of paper, or add any embellishments you like.

4. Add a Sweet Message

Now for the fun part: writing your Valentine’s message! Using a blank piece of white cardstock, write something like, “You’re the icing on my cake!” or “Sweetest Valentine, you make life sweeter.” You can also use stamps, stickers, or handwrite a personalized message to make the card extra meaningful.

5. Finishing Touches

Optional: To finish off your card, add some glitterrhinestones, or even a small ribbon on the side for a bit of extra flair. These little details will make your card stand out and feel truly special.

Why Choose a Layered Paper Valentine’s Cake Template?

This Layered Paper Valentine’s Cake Template is perfect for people who love crafting and want to give a personalized gift. It’s a creative way to show someone you care without breaking the bank, and it’s also a fantastic option for kids to make for friends or classmates. Plus, it’s an eco-friendly alternative to buying a traditional card! The beauty of this card is that you can get as creative as you want, with endless possibilities for colors, patterns, and decorations.

Whether you’re crafting for a loved one, a friend, or a family member, this layered cake card will show them just how much they mean to you. It’s the perfect way to bring a smile to anyone’s face this Valentine’s Day.

Get Your Free Layered Paper Valentine’s Cake Template!

To make things even easier, we’ve got a free downloadable template for you!

Simply print it out, trace the shapes onto your cardstock, and follow the step-by-step instructions to create your very own layered Valentine’s cake card. Download your free template and get started today!

Posted in Christmas, Lifestyle

12 Gingerbread House Crafts

Ready to get into the holiday spirit? Gingerbread house crafts are a fun, festive way to celebrate! Whether you’re making edible creations or crafty decorations, these 11 easy projects will spark your creativity and bring some extra holiday cheer to your home. Let’s get started!

1. Brown Paper Bag Garland


2. Kraft paper Gift Bags


3. Cinnamon Salt Dough Ornaments


4. Three Dimensional Cardboard House


5. Cinnamon scented Salt Dough ornaments


6. Scrap wood Decor


7. Cardboard Playhouse Facade


8. Two Dimensional Cardboard Decor


9. Cardstock Ornament


10. Plastic Dollar Store Decor Glowup


11. $5 Doormat Glowup

12. White Paper Gingerbread House

Gift Wrapping

No matter which gingerbread house craft you choose, these fun and festive projects are sure to bring a touch of holiday magic to your home. Whether you’re crafting with kids, decorating your space, or just enjoying some creative time, these ideas offer something for everyone. So gather your supplies, get crafting, and make this holiday season extra sweet with your own gingerbread-inspired creations! Happy

crafting!

A LITTLE CHRISTMAS GIFT FOR YOU

📖 FREE BOOKMARK PRINTABLE 📖

Posted in Christmas, Lifestyle

Advent Calendar for Kids: Crafting a Meaningful Holiday Tradition

The holiday season is the perfect time to engage kids in activities that teach important values like kindness, gratitude, and creativity. One of the most fun and memorable ways to do this is by creating your own advent calendar filled with thoughtful, hands-on activities for the family. I started making these advent calendars a couple of years ago, and every year I add a little something special to make it even more meaningful.

My Advent Calendar Journey

I first began this craft in 2022, planning to make individual calendars for each of my kids. But life had other plans, and I didn’t quite finish them. Last year, I was still working through grief after the loss of my dad, so I ended up keeping it simple — just gluing the pieces together and displaying it as a basic version of what I had envisioned.

But this year? I’m so excited to share that I’ve completed my advent calendar project and made it better than ever! I even created printable inserts with a list of 24 thoughtful activity ideas to inspire family fun during the holiday season. If you’re looking to craft your own meaningful advent calendar, here’s a step-by-step guide to get you started!

Materials You’ll Need:

  • Cardboard (for the base of the calendar)
  • Hot glue gun & glue sticks (for assembly)
  • Box cutter (for cutting out shapes)
  • Cutting mat (to protect your work surface)
  • White Sharpie Creative Marker (for adding details)

Step-by-Step Instructions:

  1. Cut the Cardboard: Start by cutting 15 strips of cardboard, each 4-5 inches wide. The height of these strips will vary from 6 inches to 22 inches, depending on how tall you want your advent calendar village to be. These strips will form the walls of your little cardboard village.
  2. Shape the Roofs: For each piece of cardboard, cut out the roof shapes to give your village a house-like look. You can make the roofs as simple or as intricate as you like.
  3. Add Windows and Doors: The next step is to create a minimum of 24 cutouts for windows and doors on your village houses. Most of these will be the “surprises” that hold your daily activity cards. Make sure to place the doors and windows thoughtfully — you’ll want to have them evenly spaced across your village.
  4. Dry Fit and Assemble: Before gluing everything together, dry fit the cardboard pieces to make sure everything aligns the way you want it. Once you’re happy with the layout, start gluing the pieces together using your hot glue gun. Be sure to leave the backs of the windows and doors open so you can insert the activity cards.
  5. Final Touches: Once your village is assembled, add finishing touches like a bit of decoration with your paint marker. You can draw lines, patterns, numbers, or add little details to the cardboard houses to make them feel even more festive!

Thoughtful Advent Activities for the Family

The best part about this DIY advent calendar is that it’s filled with meaningful activities to do together as a family. I’ve included a list of thoughtful ideas that promote gratitude, kindness, and creativity.

These activities don’t require a lot of time or money but are a great way to slow down and savor the season with your kids.

FULL LIST + Printable Cards HERE

Final Thoughts

Creating an advent calendar for your kids can be a fun and meaningful holiday tradition that helps teach important values while also sparking excitement and joy as you count down to Christmas. Whether you go all out with a creative DIY village like I did or keep it simple, the goal is to make memories and share quality time together.

What activities would you include in your advent calendar? Let me know in the comments — I’d love to hear your ideas!

Happy holidays and happy crafting! 🎄

FIND THIS VIDEO ON INSTAGRAM